前阵子刷到涛叔的《自动化登录堡垒机》,用 expect 自动输密码和 OTP。我平时就用 1Password 管理密码和密钥,所以直接用它的 SSH Agent 来存堡垒机的密钥,本地不用留私钥。OTP 一开始也想用 1Password CLI 来获取,但实测太慢了,最后换成了 2fa 工具。
方案一:1Password CLI
先装 1Password CLI:
# macOS
brew install 1password-cli
# 其它系统参考官方文档
# https://developer.1password.com/docs/cli/get-started/#step-1-install-1password-cli
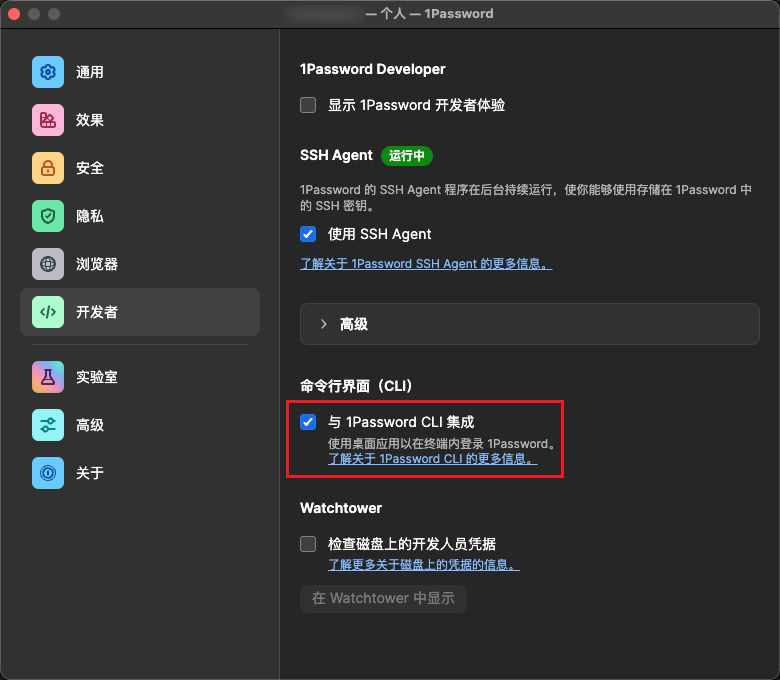
装好后在 1Password 设置里开启「与 1Password CLI 集成」:
之后就能在终端用了,常用命令:
op vault list                    # 保险库列表
op item list                     # 项目列表
op item get {id/name}            # 项目信息
op item get {id/name} --reveal   # 包含密码
op item get {id/name} --reveal --format json  # JSON 格式
op item get {id/name} --otp      # 一次性密码
还需要装 jq 来解析 JSON,从 1Password 的项目信息里提取密码和一次性密码:
# macOS
brew install jq
# Debian/Ubuntu
sudo apt-get install jq
# RedHat/CentOS
yum install jq
脚本改动不大,把硬编码的密码和动态口令改成用 op 命令获取就行:
#!/usr/bin/expect

trap {
    set XZ [stty rows   ]
    set YZ [stty columns]
    stty rows $XZ columns $YZ < $spawn_out(slave,name)
} WINCH

set OP_ITEM_ID "Bastion-Host-Login"  # 换成你的项目 ID 或名称

if {[catch {exec op item get ${OP_ITEM_ID} --reveal --format json} data]} {
    puts "错误: 无法获取1Password数据,请确保已登录op CLI"
    exit 1
}

if {[catch {exec echo $data | jq -r {.fields[] | select(.id == "password") | .value}} password]} {
    puts "错误: 无法解析密码"
    exit 1
}

if {[catch {exec echo $data | jq -r {.fields[] | select(.type == "OTP") | .totp}} totp]} {
    puts "错误: 无法解析TOTP"
    exit 1
}

spawn ssh foo@example.zz.ac

expect "Password:"
send "$password\r"

expect "Verification code:"
send "$totp\r"

interact
脚本里的 catch 命令类似 try-catch,失败返回非零值,成功返回 0 并把结果存到变量里。用之前把 OP_ITEM_ID 换成实际值:
op item list                     # 列出所有项目
op item list | grep "堡垒机"     # 搜索特定名称
1Password CLI 的性能问题
用起来才发现,这个脚本慢得离谱。登录一次要 3-10 秒,跟手动输入差不多,自动化了个寂寞 ¯\(ツ)/¯
问题出在 op 命令获取密码太慢。试过指定保险库、减少字段,都没用。Google 搜了一下,发现这是老问题了,一直没解决。
- 1password cli v 2.6.0 is still slow.
- CLI is so/too slow
- CLI commands are very slow
- Why is the CLI so slow? Any tips?
官方说 macOS 有缓存优化,加 --debug 确实显示缓存命中了,但速度还是很慢:
op item get xxxx --reveal --debug
23:19PM | DEBUG | Session delegation enabled
23:19PM | DEBUG | NM request: NmRequestAccounts
23:19PM | DEBUG | NM response: Success
23:19PM | DEBUG | NM request: NmRequestAccounts
23:19PM | DEBUG | NM response: Success
23:19PM | DEBUG | InitDefaultCache: successfully initialized cache
23:19PM | DEBUG | EncryptedKeysets: Cache hit on keyset
23:19PM | DEBUG | AllVaults: cache hit on vault xxxxxxxxxxxxxxxxx
23:19PM | DEBUG | AllVaults: cache hit on vault xxxxxxxxxxxxxxxxx
23:19PM | DEBUG | AllVaults: cache hit on vault xxxxxxxxxxxxxxxxx
23:19PM | DEBUG | VaultItems: cache hit on vault items of vault xxxxxxxxxxxxxxxxx
23:19PM | DEBUG | VaultItems: cache hit on vault items of vault xxxxxxxxxxxxxxxxx
23:19PM | DEBUG | VaultItems: cache hit on vault items of vault xxxxxxxxxxxxxxxxx
23:19PM | DEBUG | VaultItems: cache hit on vault items of vault xxxxxxxxxxxxxxxxx
23:19PM | DEBUG | Item: VaultItems cache hit for vault xxxxxxxxxxxxxxxxx - validating staleness using item version
23:19PM | DEBUG | Item: cache hit on item xxxxxxxxxxxxxxxxx of vault xxxxxxxxxxxxxxxxx
折腾半天,既然 CLI 的性能解决不了,就换个思路:SSH 密钥管认证,独立的 2FA 工具管 OTP。
方案二:SSH 密钥 + 2FA
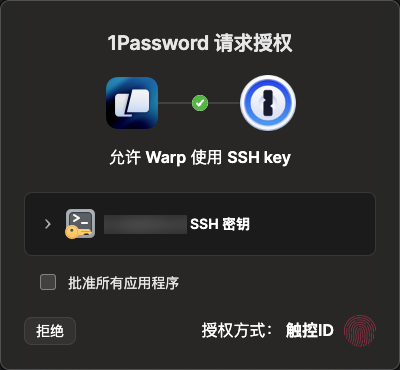
1Password 还有个 SSH Agent 功能,可以把密钥存到云端。每次用的时候弹窗确认一下,哪个客户端在请求用哪个密钥,一目了然。
好处是本地不用存私钥,而且能跨设备同步。
需要在 1Password 设置里开启「使用 SSH Agent」。
配置 SSH Agent
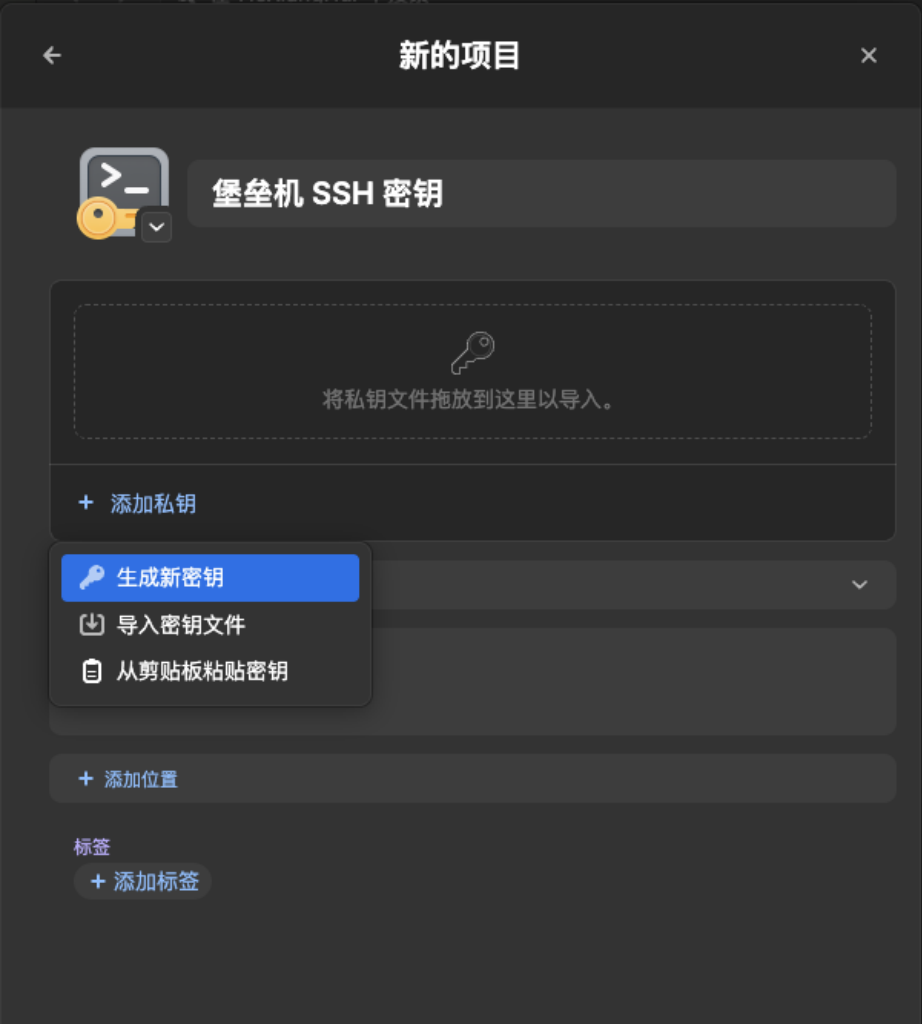
在 1Password 里创建 SSH 密钥项目,可以导入现有密钥或者生成新的。
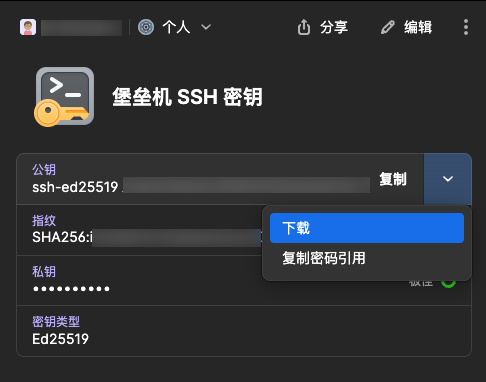
然后把公钥保存到 ~/.ssh/bastion.pub,避免密钥太多触发 Too many authentication failures。
接着在 ~/.ssh/config 里加:
Host bastion
    HostName example.zz.ac  # 堡垒机地址
    Port 22                 # 堡垒机端口
    IdentitiesOnly yes
    IdentityFile ~/.ssh/bastion.pub
    IdentityAgent "~/.1password/agent.sock"
这样 ssh bastion 就能免密登录了,但还差 OTP。
配置 2FA
装个 2fa 工具:
go install rsc.io/2fa@latest
2fa -add bastion           # 添加密钥
2fa key for bastion:
2fa bastion                # 获取验证码
211762
我对脚本做了优化,加了超时处理:
#!/usr/bin/expect

trap {
    set XZ [stty rows   ]
    set YZ [stty columns]
    stty rows $XZ columns $YZ < $spawn_out(slave,name)
} WINCH

spawn 2fa bastion
expect -re "(.*)\n"
set totp $expect_out(1,string)

spawn ssh example.zz.ac

expect {
    "Verification code:" {
        send "$totp\r"
    }
    timeout {
        puts "超时: 未收到 OTP 提示"
        exit 1
    }
}

expect {
    "*$" { }
    "*#" { }
    "*>" { }
    timeout {
        puts "登录超时"
        exit 1
    }
}

# send "ls -l\r"  # 登录后可以执行命令

interact
实测登录只要 1 秒左右,比之前快多了,稳定性也更好。