从 Eureka 切换到 PaperMod 主题已经快半年时间了,经过一番折腾和优化,基本达到了我想要的效果。这篇文章记录了我对这个主题的各种改造,如果你也在使用 PaperMod,下面的内容可能对你有帮助。
环境信息:
- Hugo 版本: v0.147.2+extended
- PaperMod 版本: v8.0
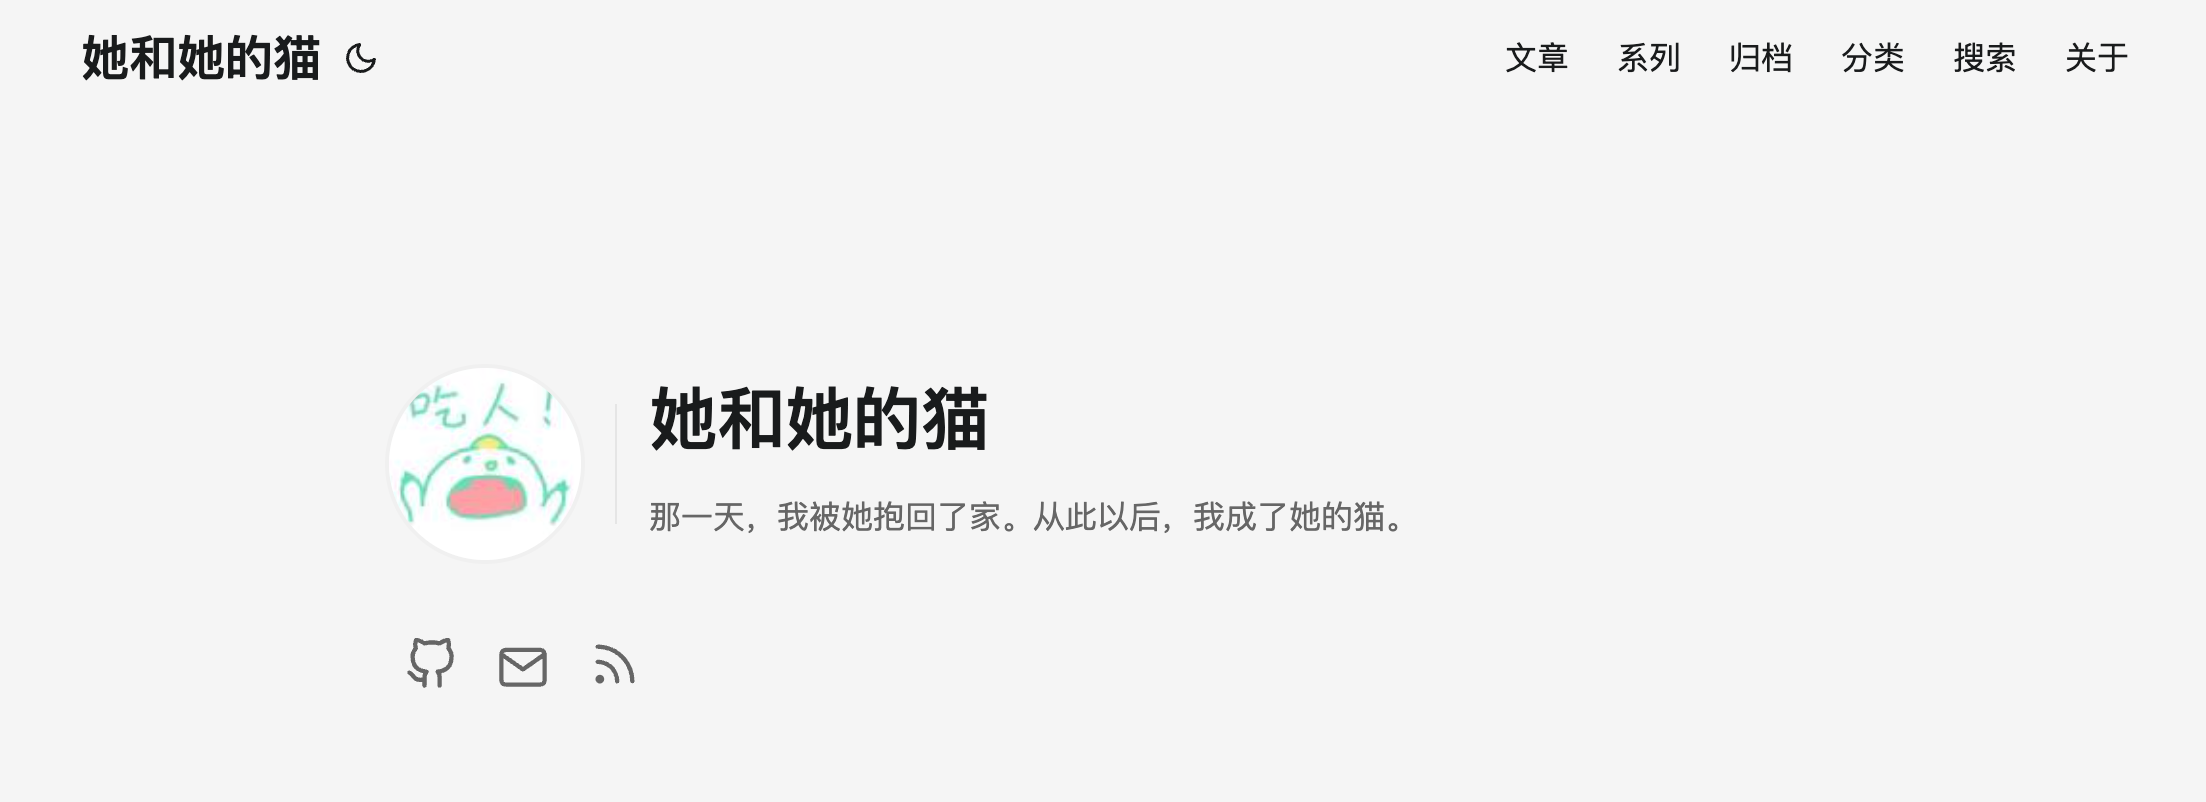
优化主页个人信息展示
对 PaperMod 的 Home-Info 布局做了优化,增加了头像展示和图标悬浮高亮效果,支持响应式布局。
- 创建
layouts/partials/home_info.html文件:
点击展开完整代码
{{- with site.Params.homeInfoParams }}
<article class="first-entry home-info">
    <div class="home-info-container home-info-main-container">
        <div class="home-info-content-wrapper">
            {{- with site.Params.homeInfoParams }}
            <div class="home-info-avatar home-info-avatar-container">
                {{- if .ImageUrl -}}
                {{- $imgSrc := .ImageUrl | absURL }}
                {{- $img := resources.Get .ImageUrl }}
                {{- if $img }}
                {{- $size := printf "%dx%d" (.ImageWidth | default 100) (.ImageHeight | default 100) }}
                {{- $img = $img.Resize $size }}
                {{- $imgSrc = $img.Permalink }}
                {{- end }}
                <img id="home-info-avatar"
                     draggable="false"
                     src="{{ $imgSrc }}"
                     alt="{{ .Title | default "profile image" }}"
                     height="{{ .ImageHeight | default 100 }}"
                     width="{{ .ImageWidth | default 100 }}"
                     class="home-info-avatar-img" />
                {{- end }}
            </div>
            {{- end }}
            <div class="entry-main home-info-text-content">
                <header class="entry-header">
                    <h1>{{ .Title | markdownify }}</h1>
                </header>
                <div class="entry-content">
                    {{ .Content | markdownify }}
                </div>
            </div>
        </div>
        <footer class="entry-footer">
            {{ partial "social_icons.html" (dict "align" site.Params.homeInfoParams.AlignSocialIconsTo) }}
        </footer>
    </div>
</article>
{{- end -}}
- 在
assets/css/extended/blank.css文件中添加样式:
点击展开完整代码
/* Home Info Layout Styles */
.home-info-main-container {
    display: flex;
    flex-direction: column;
    gap: 24px;
    max-width: 100%;
}

.home-info-content-wrapper {
    display: flex;
    align-items: center;
    gap: 32px;
}

.home-info-avatar-container {
    display: flex;
    align-items: center;
    justify-content: center;
    flex-shrink: 0;
    position: relative;
}

.home-info-avatar-container::after {
    content: '';
    position: absolute;
    right: -16px;
    top: 50%;
    transform: translateY(-50%);
    width: 1px;
    height: 60px;
    background-color: #e5e5e5;
}

.home-info-text-content {
    flex: 1;
    display: flex;
    flex-direction: column;
    justify-content: center;
    margin-top: 8px;
}

.home-info-avatar-img {
    border-radius: 50% !important;
    border: 2px solid #f0f0f0;
    transition: transform 0.2s ease;
}

.home-info-avatar-img:hover {
    transform: scale(1.02);
}

/* 响应式设计 */
@media (max-width: 768px) {
    .home-info-content-wrapper {
        flex-direction: column;
        gap: 20px;
        text-align: center;
    }

    .home-info-text-content {
        margin-top: 0;
    }

    /* 移动端隐藏分隔线 */
    .home-info-avatar-container::after {
        display: none;
    }

    /* 移动端社交图标居中 */
    .home-info .entry-footer {
        display: flex;
        justify-content: center;
        align-items: center;
    }
}

/* 图标悬浮高亮 */
.social-icons svg:hover {
    transition: 0.15s;
}

.social-icons a[href*='mailto']:hover svg {
    color: #ea4335 !important;
}

.social-icons a[href*='github']:hover svg {
    color: #7c3aed !important;
}

.social-icons a[href*='index.xml']:hover svg {
    color: #ff6600 !important;
}
- 在
config.yaml中配置头像地址(支持本地或远程图片):
params:
  homeInfoParams:
    Title: "她和她的猫"
    ImageUrl: /images/avatar.jpeg
    Content: 那一天,我被她抱回了家。从此以后,我成了她的猫。
移除主页冗余分页
在 PaperMod 主题中,默认会为主页的文章列表生成分页(/,/page/2/…),这导致主页和文章列表页面(/posts/,/posts/page/2/…)内容重复,产生了大量冗余页面。
为了解决这个问题,我修改了主页布局,让主页只展示最新的几篇文章,不再生成分页。可以通过「查看更多」按钮跳转到文章列表页面。
Paginator pages 从 62 降到 43,减少了 19 个冗余页面
创建 layouts/index.html 文件,覆盖主题的首页模板。
点击展开完整代码
{{- define "main" }}
{{- if site.Params.profileMode.enabled }}
{{- partial "index_profile.html" . }}
{{- else }} {{/* if not profileMode */}}
{{- if .Content }}
<div class="post-content">
{{- if not (.Param "disableAnchoredHeadings") }}
{{- partial "anchored_headings.html" .Content -}}
{{- else }}{{ .Content }}{{ end }}
</div>
{{- end }}
{{- $pages := where site.RegularPages "Type" "in" site.Params.mainSections }}
{{- $pages = where $pages "Params.hiddenInHomeList" "!=" "true" }}
{{- if site.Params.homeInfoParams }}
{{- partial "home_info.html" . }}
{{- end }}
{{- $displayPages := first 3 $pages }}
{{- range $index, $page := $displayPages }}
{{- $class := "post-entry" }}
{{- $user_preferred := or site.Params.disableSpecial1stPost site.Params.homeInfoParams }}
{{- if (and (eq $index 0) (not $user_preferred)) }}
{{- $class = "first-entry" }}
{{- end }}
<article class="{{ $class }}">
{{- $isHidden := (.Param "cover.hiddenInList") | default (.Param "cover.hidden") | default false }}
{{- partial "cover.html" (dict "cxt" . "IsSingle" false "isHidden" $isHidden) }}
<header class="entry-header">
<h2 class="entry-hint-parent">
{{- .Title }}
{{- if .Draft }}
<span class="entry-hint" title="Draft">
<svg xmlns="http://www.w3.org/2000/svg" height="20" viewBox="0 -960 960 960" fill="currentColor">
<path
d="M160-410v-60h300v60H160Zm0-165v-60h470v60H160Zm0-165v-60h470v60H160Zm360 580v-123l221-220q9-9 20-13t22-4q12 0 23 4.5t20 13.5l37 37q9 9 13 20t4 22q0 11-4.5 22.5T862.09-380L643-160H520Zm300-263-37-37 37 37ZM580-220h38l121-122-18-19-19-18-122 121v38Zm141-141-19-18 37 37-18-19Z" />
</svg>
</span>
{{- end }}
</h2>
</header>
{{- if (ne (.Param "hideSummary") true) }}
<div class="entry-content">
<p>{{ .Summary | plainify | htmlUnescape }}{{ if .Truncated }}...{{ end }}</p>
</div>
{{- end }}
{{- if not (.Param "hideMeta") }}
<footer class="entry-footer">
{{- partial "post_meta.html" . -}}
</footer>
{{- end }}
<a class="entry-link" aria-label="post link to {{ .Title | plainify }}" href="{{ .Permalink }}"></a>
</article>
{{- end }}
{{- if gt (len $pages) 3 }}
<footer class="page-footer">
<nav class="pagination">
<a class="next" href="/posts/">
查看更多 »
</a>
</nav>
</footer>
{{- end }}
{{- end }}{{/* end profileMode */}}
{{- end }}{{- /* end main */ -}}
优化文章列表布局
PaperMod 的文章列表默认是图片在上、文字在下,看着信息密度很低。
调整了很久之后,最后选择了左右布局:文字内容在左,封面图片在右,既增加了视觉吸引力,又保持了页面的简洁性。
左:修改前,右:修改后
- 创建
layouts/_default/list.html文件:
点击展开完整代码
{{- define "main" }}
{{- if (and site.Params.profileMode.enabled .IsHome) }}
{{- partial "index_profile.html" . }}
{{- else }} {{/* if not profileMode */}}
{{- if not .IsHome | and .Title }}
<header class="page-header">
{{- partial "breadcrumbs.html" . }}
<h1>
{{ .Title }}
{{- if and (or (eq .Kind `term`) (eq .Kind `section`)) (.Param "ShowRssButtonInSectionTermList") }}
{{- with .OutputFormats.Get "rss" }}
<a href="{{ .RelPermalink }}" title="RSS" aria-label="RSS">
<svg xmlns="http://www.w3.org/2000/svg" viewBox="0 0 24 24" fill="none" stroke="currentColor" stroke-width="2"
stroke-linecap="round" stroke-linejoin="round" height="23">
<path d="M4 11a9 9 0 0 1 9 9" />
<path d="M4 4a16 16 0 0 1 16 16" />
<circle cx="5" cy="19" r="1" />
</svg>
</a>
{{- end }}
{{- end }}
</h1>
{{- if .Description }}
<div class="post-description">
{{ .Description | markdownify }}
</div>
{{- end }}
</header>
{{- end }}
{{- if .Content }}
<div class="post-content">
{{- if not (.Param "disableAnchoredHeadings") }}
{{- partial "anchored_headings.html" .Content -}}
{{- else }}{{ .Content }}{{ end }}
</div>
{{- end }}
{{- $pages := union .RegularPages .Sections }}
{{- if .IsHome }}
{{- $pages = where site.RegularPages "Type" "in" site.Params.mainSections }}
{{- $pages = where $pages "Params.hiddenInHomeList" "!=" "true" }}
{{- end }}
{{- $paginator := .Paginate $pages }}
{{- if and .IsHome site.Params.homeInfoParams (eq $paginator.PageNumber 1) }}
{{- partial "home_info.html" . }}
{{- end }}
{{- $term := .Data.Term }}
{{- range $index, $page := $paginator.Pages }}
{{- $class := "post-entry" }}
{{- $user_preferred := or site.Params.disableSpecial1stPost site.Params.homeInfoParams }}
{{- if (and $.IsHome (eq $paginator.PageNumber 1) (eq $index 0) (not $user_preferred)) }}
{{- $class = "first-entry" }}
{{- else if $term }}
{{- $class = "post-entry tag-entry" }}
{{- end }}
<article class="{{ $class }}">
<div class="entry-content-wrapper">
<header class="entry-header">
<h2 class="entry-hint-parent">
{{- .Title }}
{{- if .Draft }}
<span class="entry-hint" title="Draft">
<svg xmlns="http://www.w3.org/2000/svg" height="20" viewBox="0 -960 960 960" fill="currentColor">
<path
d="M160-410v-60h300v60H160Zm0-165v-60h470v60H160Zm0-165v-60h470v60H160Zm360 580v-123l221-220q9-9 20-13t22-4q12 0 23 4.5t20 13.5l37 37q9 9 13 20t4 22q0 11-4.5 22.5T862.09-380L643-160H520Zm300-263-37-37 37 37ZM580-220h38l121-122-18-19-19-18-122 121v38Zm141-141-19-18 37 37-18-19Z" />
</svg>
</span>
{{- end }}
</h2>
</header>
{{- if (ne (.Param "hideSummary") true) }}
<div class="entry-content">
<p>{{ .Summary | plainify | htmlUnescape }}{{ if .Truncated }}...{{ end }}</p>
</div>
{{- end }}
{{- if not (.Param "hideMeta") }}
<footer class="entry-footer">
{{- partial "post_meta.html" . -}}
</footer>
{{- end }}
</div>
<div class="entry-cover-wrapper">
{{- $isHidden := (.Param "cover.hiddenInList") | default (.Param "cover.hidden") | default false }}
{{- partial "cover.html" (dict "cxt" . "IsSingle" false "isHidden" $isHidden) }}
</div>
<a class="entry-link" aria-label="post link to {{ .Title | plainify }}" href="{{ .Permalink }}"></a>
</article>
{{- end }}
{{- if gt $paginator.TotalPages 1 }}
<footer class="page-footer">
<nav class="pagination">
{{- if $paginator.HasPrev }}
<a class="prev" href="{{ $paginator.Prev.URL | absURL }}">
« {{ i18n "prev_page" }}
{{- if (.Param "ShowPageNums") }}
{{- sub $paginator.PageNumber 1 }}/{{ $paginator.TotalPages }}
{{- end }}
</a>
{{- end }}
{{- if $paginator.HasNext }}
<a class="next" href="{{ $paginator.Next.URL | absURL }}">
{{- i18n "next_page" }}
{{- if (.Param "ShowPageNums") }}
{{- add 1 $paginator.PageNumber }}/{{ $paginator.TotalPages }}
{{- end }} »
</a>
{{- end }}
</nav>
</footer>
{{- end }}
{{- end }}{{/* end profileMode */}}
{{- end }}{{- /* end main */ -}}
- 如果你按照「移除主页冗余分页」的步骤,创建了
layouts/index.html文件,那么也需要修改该文件中文章列表的部分,修改内容与上面一样。否则可以直接跳过这一步骤。
点击展开完整代码
{{- define "main" }}
{{- if site.Params.profileMode.enabled }}
{{- partial "index_profile.html" . }}
{{- else }} {{/* if not profileMode */}}
{{- if .Content }}
<div class="post-content">
{{- if not (.Param "disableAnchoredHeadings") }}
{{- partial "anchored_headings.html" .Content -}}
{{- else }}{{ .Content }}{{ end }}
</div>
{{- end }}
{{- $pages := where site.RegularPages "Type" "in" site.Params.mainSections }}
{{- $pages = where $pages "Params.hiddenInHomeList" "!=" "true" }}
{{- if site.Params.homeInfoParams }}
{{- partial "home_info.html" . }}
{{- end }}
{{- $displayPages := first 3 $pages }}
{{- range $index, $page := $displayPages }}
{{- $class := "post-entry" }}
{{- $user_preferred := or site.Params.disableSpecial1stPost site.Params.homeInfoParams }}
{{- if (and (eq $index 0) (not $user_preferred)) }}
{{- $class = "first-entry" }}
{{- end }}
<article class="{{ $class }}">
<div class="entry-content-wrapper">
<header class="entry-header">
<h2 class="entry-hint-parent">
{{- .Title }}
{{- if .Draft }}
<span class="entry-hint" title="Draft">
<svg xmlns="http://www.w3.org/2000/svg" height="20" viewBox="0 -960 960 960" fill="currentColor">
<path
d="M160-410v-60h300v60H160Zm0-165v-60h470v60H160Zm0-165v-60h470v60H160Zm360 580v-123l221-220q9-9 20-13t22-4q12 0 23 4.5t20 13.5l37 37q9 9 13 20t4 22q0 11-4.5 22.5T862.09-380L643-160H520Zm300-263-37-37 37 37ZM580-220h38l121-122-18-19-19-18-122 121v38Zm141-141-19-18 37 37-18-19Z" />
</svg>
</span>
{{- end }}
</h2>
</header>
{{- if (ne (.Param "hideSummary") true) }}
<div class="entry-content">
<p>{{ .Summary | plainify | htmlUnescape }}{{ if .Truncated }}...{{ end }}</p>
</div>
{{- end }}
{{- if not (.Param "hideMeta") }}
<footer class="entry-footer">
{{- partial "post_meta.html" . -}}
</footer>
{{- end }}
</div>
<div class="entry-cover-wrapper">
{{- $isHidden := (.Param "cover.hiddenInList") | default (.Param "cover.hidden") | default false }}
{{- partial "cover.html" (dict "cxt" . "IsSingle" false "isHidden" $isHidden) }}
</div>
<a class="entry-link" aria-label="post link to {{ .Title | plainify }}" href="{{ .Permalink }}"></a>
</article>
{{- end }}
{{- if gt (len $pages) 3 }}
<footer class="page-footer">
<nav class="pagination">
<a class="next" href="/posts/">
查看更多 »
</a>
</nav>
</footer>
{{- end }}
{{- end }}{{/* end profileMode */}}
{{- end }}{{- /* end main */ -}}
- 在
assets/css/extended/blank.css中添加相关样式:
点击展开完整代码
/* === 文章列表左右布局样式 === */
.post-entry {
    display: flex;
    gap: var(--gap);
    align-items: stretch;
}

/* 左侧内容区域 */
.post-entry .entry-content-wrapper {
    flex: 1;
    display: flex;
    flex-direction: column;
    min-width: 0;
}

/* 右侧图片区域 */
.post-entry .entry-cover-wrapper {
    flex-shrink: 0;
    width: 225px;
}

/* 隐藏无图片容器 */
.post-entry .entry-cover-wrapper:empty,
.post-entry .entry-cover-wrapper:not(:has(.entry-cover)) {
    display: none;
}

/* 图片样式 - 统一宽高比 */
.post-entry .entry-cover {
    margin-bottom: 0;
    aspect-ratio: 2 / 1;
    overflow: hidden;
}

.post-entry .entry-cover img,
.post-entry .entry-cover picture,
.post-entry .entry-cover picture img {
    width: 100%;
    height: 100%;
    object-fit: cover;
    border-radius: var(--radius);
}

/* 内容间距 */
.post-entry .entry-header {
    margin-bottom: 8px;
}

.post-entry .entry-content {
    margin: 0 0 8px 0;
}

.post-entry .entry-footer {
    margin-top: auto;
}

/* 移动端 */
@media (max-width: 640px) {
    /* 移动端隐藏封面图片 */
    .post-entry .entry-cover-wrapper {
        display: none;
    }
}
- 在
config.yaml中启用封面:
  cover:
    hiddenInList: false # 在文章列表和首页显示封面
    hiddenInSingle: true # 在单页隐藏封面
解决中文字数统计问题
Hugo 默认的字数统计对中日韩(CJK)文字不准确,需要在 config.yaml 中开启 hasCJKLanguage 选项:
hasCJKLanguage: true
解决图片加载抖动(CLS)问题
使用 PageSpeed Insights 检测博客时,发现 CLS(Cumulative Layout Shift,累积布局偏移)分数偏高,页面加载时图片会造成明显的抖动现象。
CLS 是 Google 评估网站用户体验的重要指标之一,分数过高通常是因为图片加载时浏览器不知道应该预留多大的空间,等图片加载完成后就会把下面的内容挤下去,导致页面跳动。
解决办法就是为图片添加正确的宽高属性,让浏览器在加载前预留空间。
创建 layouts/_default/_markup/render-image.html 文件:
点击展开完整代码
{{- $u := urls.Parse .Destination -}}
{{- $src := $u.String -}}
{{- $img := "" -}}
{{- $width := "" -}}
{{- $height := "" -}}
{{- $aspectRatio := "" -}}

{{- if not $u.IsAbs -}}
  {{- $path := strings.TrimPrefix "./" $u.Path -}}

  {{- /* 查找图片:优先页面资源,其次 assets 目录 */ -}}
  {{- $img = or (.PageInner.Resources.Get $path) (resources.Get (strings.TrimPrefix "/" $path)) -}}

  {{- if $img -}}
    {{- /* 获取图片基本信息 */ -}}
    {{- $src = $img.RelPermalink -}}

    {{- /* 只对栅格图片获取宽高,SVG 跳过 */ -}}
    {{- if ne $img.MediaType.SubType "svg" -}}
      {{- /* 确保宽高有效(大于 0) */ -}}
      {{- if and (gt $img.Width 0) (gt $img.Height 0) -}}
        {{- $width = printf "%d" $img.Width -}}
        {{- $height = printf "%d" $img.Height -}}
        {{- $aspectRatio = printf "%.4f" (div (float $img.Width) (float $img.Height)) -}}
      {{- end -}}
    {{- end -}}

    {{- /* 保留原始 URL 的 query 和 fragment */ -}}
    {{- with $u.RawQuery -}}
      {{- $src = printf "%s?%s" $src . -}}
    {{- end -}}
    {{- with $u.Fragment -}}
      {{- $src = printf "%s#%s" $src . -}}
    {{- end -}}
  {{- else -}}
    {{- /* 如果找不到,保持原始路径(static 目录) */ -}}
    {{- $src = $u.String -}}
  {{- end -}}
{{- end -}}

{{- /* 设置基础属性 */ -}}
{{- $attributes := dict "alt" .Text "src" $src "loading" "lazy" "decoding" "async" -}}

{{- /* 添加 title 属性(如果存在) */ -}}
{{- with .Title -}}
  {{- $attributes = merge $attributes (dict "title" (. | transform.HTMLEscape)) -}}
{{- end -}}

{{- /* 如果获取到了尺寸信息,设置宽高和宽高比 */ -}}
{{- if and $width $height -}}
  {{- $attributes = merge $attributes (dict "width" $width "height" $height) -}}
  {{- $style := printf "max-width: 100%%; height: auto; aspect-ratio: %s;" $aspectRatio -}}
  {{- $attributes = merge $attributes (dict "style" $style) -}}
{{- else -}}
  {{- /* 如果没有尺寸信息,至少保持响应式 */ -}}
  {{- $attributes = merge $attributes (dict "style" "max-width: 100%; height: auto;") -}}
{{- end -}}

{{- /* 合并用户自定义属性 */ -}}
{{- $attributes = merge .Attributes $attributes -}}

{{- if .Title -}}
<figure>
  <img
    {{- range $k, $v := $attributes -}}
      {{- if $v -}}
        {{- printf " %s=%q" $k $v | safeHTMLAttr -}}
      {{- end -}}
    {{- end -}}>
  <figcaption><p>{{ .Title | markdownify }}</p></figcaption>
</figure>
{{- else -}}
<img
  {{- range $k, $v := $attributes -}}
    {{- if $v -}}
      {{- printf " %s=%q" $k $v | safeHTMLAttr -}}
    {{- end -}}
  {{- end -}}>
{{- end -}}
提示:图片需要放在文章同目录(Page Bundle)或
assets目录下,否则无法自动获取尺寸。
优化阅读体验
对字体、排版、间距等进行了优化,主要借鉴了 Dvel 和 atpX 的博客。
首先引入 Inter 字体,在 layouts/partials/extend_head.html 中添加:
<!-- Inter 字体引入 -->
<link rel="preconnect" href="https://fonts.googleapis.com">
<link rel="preconnect" href="https://fonts.gstatic.com" crossorigin>
<link href="https://fonts.googleapis.com/css2?family=Inter:wght@400;700&display=swap" rel="stylesheet">
接下来创建 assets/css/extended/reading.css 文件,定义详细的样式规则来优化文章排版、代码块、表格等元素的显示效果:
点击展开完整代码
/* === 1. CSS 变量定义 === */
:root {
    /* 颜色 */
    --primary: #1a1b1c;
    --content: #333435;
    --secondary: #666;
    --sec-color: #f2f3f4;
    --link-color: #2d8cdc;
    --code-bg: #f5f5f5;
    --sec-note-color: #6e6e6e;

    /* 字体 */
    --font-fallback: -apple-system, BlinkMacSystemFont, system-ui, sans-serif, 'Color Emoji';
    --font-family: 'Inter', var(--font-fallback);
    --code-font-family: 'Fira Code', Menlo, 'Lucida Console', 'DejaVu Sans Mono', var(--font-fallback);
}

/* 暗色模式 */
.dark {
    --primary: #f2f2f2;
    --content: #e3e3e3;
    --sec-color: #2A2C2B;
    --sec-note-color: #808080;
}

/* === 2. 全局字体设置 === */
body {
    font-family: var(--font-family);
    font-size: 18px;
    margin: 0;
}

/* 标题字重 */
h1, h2, h3, h4, h5, h6 {
    font-weight: 700;
}

/* 代码字体 */
.post-content code,
.post-content code span {
    font-family: var(--code-font-family);
}

/* === 3. 文章标题样式 === */
.post-title {
    font-size: 34px;
    margin: 8px 0;
}

.post-content h1,
.post-content h2,
.post-content h3,
.post-content h4,
.post-content h5,
.post-content h6 {
    margin-bottom: 18px;
    font-weight: 600;
}

.post-content h1 {
    margin-top: 48px;
    padding-bottom: 13px;
    border-bottom: 1px solid var(--sec-color);
}

.post-content h2 {
    font-size: 24px;
    margin-top: 48px;
    padding-bottom: 13px;
    border-bottom: 1px solid var(--sec-color);
}

.post-content h3 {
    font-size: 22px;
    margin-top: 32px;
}

.post-content h4 {
    font-size: 20px;
    margin-top: 23px;
}

.post-content h5 {
    font-size: 16px;
    margin-top: 18px;
}

.post-content h6 {
    font-size: 14px;
    margin-top: 16px;
}

/* === 4. 正文样式 === */
.post-content {
    line-height: 1.86;
}

.post-content p,
.post-content blockquote,
.post-content figure,
.post-content table {
    margin: 18px 0;
}

.post-content blockquote {
    color: var(--sec-note-color);
}

.post-content hr {
    margin: 64px 128px;
}

.post-content ul,
.post-content ol,
.post-content dl,
.post-content li {
    margin: 8px 0;
}

/* === 5. 链接样式 === */
.post-content a {
    color: var(--link-color);
    box-shadow: none;
    text-decoration: none;
}

.post-content a:hover {
    text-decoration: underline;
}

/* === 6. 行内代码样式 === */
.post-content code {
    margin: unset;
    padding: 5px 7px;
    border-radius: 8px;
}

/* === 6.5. 折叠块样式 === */
.post-content details summary {
    cursor: zoom-in;
    user-select: none;
}

.post-content details[open] summary {
    cursor: zoom-out;
}

/* === 7. 图片样式 === */
.post-content img {
    margin: auto;
    max-width: 100%;
    height: auto;
    transition: opacity 0.3s ease;
}

.post-content figure {
    margin: 27px 0;
    text-align: center;
}

.post-content figure img {
    border-radius: 8px;
    box-shadow: 0 4px 12px rgba(0, 0, 0, 0.1);
    transition: transform 0.2s ease, box-shadow 0.2s ease;
}

.post-content figure img:hover {
    transform: translateY(-2px);
    box-shadow: 0 8px 24px rgba(0, 0, 0, 0.15);
}

.post-content figcaption {
    margin-top: 9px;
    font-size: 16px;
    color: var(--secondary);
    font-style: italic;
}

/* === 8. 移动端响应式优化 === */
@media (max-width: 768px) {
    .post-content img {
        border-radius: 4px;
    }

    .post-content figure img:hover {
        transform: none;
    }
}

/* === 9. 防止滚动条导致页面抖动 === */
html {
    overflow-y: scroll;
}

:root {
    overflow-y: auto;
    overflow-x: hidden;
}

:root body {
    position: absolute;
    width: 100vw;
    overflow: hidden;
}
字体本地化
上面使用了 Inter 字体来优化阅读体验,但直接使用 Google Fonts 在国内访问会遇到加载缓慢甚至超时的问题,导致字体加载失败或页面渲染阻塞。因此需要将字体文件下载到本地托管,既能提升访问速度,也能保护用户隐私。
- 创建
download-fonts.py脚本,自动下载字体并生成本地 CSS:
点击展开完整代码
#!/usr/bin/env python3
"""
下载 Google Fonts 到本地目录
使用方法: python3 download-fonts.py
"""

import os
import re
import requests
from pathlib import Path
from urllib.parse import urlparse

# 配置
GOOGLE_FONTS_URL = "https://fonts.googleapis.com/css2?family=Inter:wght@400;700&display=swap"
STATIC_DIR = Path("static")
FONTS_DIR = STATIC_DIR / "fonts"  # 字体文件放在 static 目录,Hugo 会自动复制
CSS_DIR = Path("assets") / "css" / "extended"  # CSS 放在 assets 目录
OUTPUT_CSS = CSS_DIR / "fonts.css"

# 创建必要的目录
FONTS_DIR.mkdir(parents=True, exist_ok=True)
CSS_DIR.mkdir(parents=True, exist_ok=True)

def download_file(url, dest_path):
    """下载文件到指定路径"""
    print(f"下载: {url}")
    response = requests.get(url, timeout=30)
    response.raise_for_status()

    with open(dest_path, 'wb') as f:
        f.write(response.content)
    print(f"保存到: {dest_path}")
    return dest_path

def get_google_fonts_css():
    """获取 Google Fonts CSS"""
    print(f"获取 Google Fonts CSS: {GOOGLE_FONTS_URL}")

    headers = {
        'User-Agent': 'Mozilla/5.0 (Windows NT 10.0; Win64; x64) AppleWebKit/537.36'
    }

    response = requests.get(GOOGLE_FONTS_URL, headers=headers, timeout=30)
    response.raise_for_status()

    return response.text

def extract_font_urls(css_content):
    """从 CSS 中提取字体文件 URL"""
    pattern = r'url\((https://[^)]+)\)'
    urls = re.findall(pattern, css_content)
    return urls

def download_fonts(css_content):
    """下载所有字体文件并替换 CSS 中的 URL"""
    font_urls = extract_font_urls(css_content)

    if not font_urls:
        print("❌ 未找到字体文件 URL")
        return css_content

    print(f"找到 {len(font_urls)} 个字体文件")

    for idx, url in enumerate(font_urls, 1):
        parsed = urlparse(url)
        url_path = parsed.path
        ext = os.path.splitext(url_path)[1] or '.woff2'

        filename = f"inter-{idx}{ext}"
        local_path = FONTS_DIR / filename

        try:
            download_file(url, local_path)
            relative_url = f"/fonts/{filename}"
            css_content = css_content.replace(url, relative_url)
        except Exception as e:
            print(f"❌ 下载失败: {url}")
            print(f"   错误: {e}")

    return css_content

def generate_local_css():
    """生成本地字体 CSS 文件"""
    print("\n" + "="*50)
    print("开始下载 Google Fonts")
    print("="*50 + "\n")

    try:
        css_content = get_google_fonts_css()
        print(f"✅ 成功获取 CSS (长度: {len(css_content)} 字节)\n")

        local_css = download_fonts(css_content)

        header = """/*
 * Google Fonts - Inter
 * 本地托管版本,自动生成于 download-fonts.py
 */

"""
        local_css = header + local_css

        with open(OUTPUT_CSS, 'w', encoding='utf-8') as f:
            f.write(local_css)

        print(f"\n✅ CSS 文件已保存到: {OUTPUT_CSS}")
        print(f"✅ 字体文件已保存到: {FONTS_DIR}/")
        print("\n重新构建网站: hugo --gc --minify\n")

    except Exception as e:
        print(f"\n❌ 错误: {e}")
        import traceback
        traceback.print_exc()

if __name__ == "__main__":
    try:
        import requests
    except ImportError:
        print("❌ 请先安装 requests 库: pip install requests")
        exit(1)

    generate_local_css()
- 运行脚本
# 1. 安装依赖
pip install requests

# 2. 运行脚本
python3 download-fonts.py
脚本会自动:
- 下载字体文件到
static/fonts/目录 - 生成本地 CSS 到
assets/css/extended/fonts.css - Hugo 会自动加载
extended目录中的 CSS
- 更新
layouts/partials/extend_head.html,移除 Google Fonts 的引用,改用本地字体预加载:
- <!-- Inter 字体引入 -->
- <link rel="preconnect" href="https://fonts.googleapis.com">
- <link rel="preconnect" href="https://fonts.gstatic.com" crossorigin>
- <link href="https://fonts.googleapis.com/css2?family=Inter:wght@400;700&display=swap" rel="stylesheet">
+ <!-- 预加载关键字体文件,提升首屏渲染速度 -->
+ <link rel="preload" href="/fonts/inter-7.woff2" as="font" type="font/woff2" crossorigin>
通过 preload 提示浏览器优先加载最常用的字体文件(inter-7.woff2),避免字体加载延迟导致的页面重排。
显示文章所属的分类和系列
为了方便快速查看相关内容,我在文章标题下方的元数据区域增加了分类和系列的链接。
- 创建
layouts/partials/post_meta.html文件:
点击展开完整代码
{{- $scratch := newScratch }}
{{- if not .Date.IsZero -}}
{{- $scratch.Add "meta" (slice (printf "<span title='%s'>%s</span>" (.Date) (.Date | time.Format (default "January 2, 2006" site.Params.DateFormat)))) }}
{{- end }}
{{- if (.Param "ShowReadingTime") -}}
{{- $scratch.Add "meta" (slice (i18n "read_time" .ReadingTime | default (printf "%d min" .ReadingTime))) }}
{{- end }}
{{- if (.Param "ShowWordCount") -}}
{{- $scratch.Add "meta" (slice (i18n "words" .WordCount | default (printf "%d words" .WordCount))) }}
{{- end }}
{{- if not (.Param "hideAuthor") -}}
{{- with (partial "author.html" .) }}
{{- $scratch.Add "meta" (slice .) }}
{{- end }}
{{- end }}
{{- $categories := .Language.Params.Taxonomies.category | default "categories" }}
{{- with ($.GetTerms $categories) }}
{{- $categoryLinks := slice }}
{{- range . }}
{{- $categoryLinks = $categoryLinks | append (printf "<a href=\"%s\">%s</a>" .Permalink .LinkTitle) }}
{{- end }}
{{- $categoryString := delimit $categoryLinks " " | safeHTML }}
{{- $scratch.Add "meta" (slice (string $categoryString)) }}
{{- end }}
{{- $series := .Language.Params.Taxonomies.series | default "series" }}
{{- with ($.GetTerms $series) }}
{{- $seriesLinks := slice }}
{{- range . }}
{{- $seriesLinks = $seriesLinks | append (printf "<a href=\"%s\">%s</a>" .Permalink .LinkTitle) }}
{{- end }}
{{- $seriesString := delimit $seriesLinks " " | safeHTML }}
{{- $scratch.Add "meta" (slice (string $seriesString)) }}
{{- end }}
{{- with ($scratch.Get "meta") }}
{{- delimit . " · " | safeHTML -}}
{{- end -}}
- 在
assets/css/extended/blank.css中添加以下样式:
.post-meta a,
.archive-meta a,
.entry-footer a {
    color: var(--secondary) !important;
    text-decoration: none;
    transition: color 0.2s ease;
}

.post-meta a:hover,
.archive-meta a:hover,
.entry-footer a:hover {
    color: var(--primary);
    text-decoration: underline;
}
使用 Waline 评论系统
Waline 是一款简洁、安全的评论系统,提供了多种部署方式。在体验了 LeanCloud 和 Vercel 这两种无服务部署方式后,发现速度太慢,最后用 Docker 自建了服务。
部署服务端
如果你也想使用 Docker 部署服务端,可以参考我的 docker-compose.yaml:
点击展开完整配置
services:
  waline:
    container_name: waline
    image: lizheming/waline:latest
    restart: always
    ports:
      - 8360:8360
    volumes:
      - ${PWD}/data:/app/data
    environment:
      # 时区设置
      TZ: 'Asia/Shanghai'

      # 数据库配置(使用 SQLite)
      SQLITE_PATH: '/app/data'

      # 用户认证配置
      JWT_TOKEN: '用户登录密钥,随机字符串即可'

      # 站点信息
      SITE_NAME: '她和她的猫'
      SITE_URL: 'https://her-cat.com'
      SECURE_DOMAINS: 'her-cat.com'

      # 邮件通知配置
      AUTHOR_EMAIL: 'hxhsoft@foxmail.com'
      SMTP_SERVICE: '163'
      SMTP_USER: 'hercat2025@163.com'
      SMTP_PASS: '邮箱密码'
      SMTP_SECURE: 'true'
      SENDER_NAME: '她和她的猫'

      # 隐私保护配置
      DISABLE_USERAGENT: true
      DISABLE_REGION: true

      # 头像服务配置
      GRAVATAR_STR: 'https://cn.cravatar.com/avatar/{{mail|lower|trim|md5}}?s=150&d=retro'
提示:记得将上面的配置中的站点信息、邮箱账号和密码替换成你自己的。
JWT_TOKEN使用任意随机字符串即可。
然后执行 docker-compose up -d 启动服务,Waline 会自动创建 SQLite 数据库并监听 8360 端口。
关于头像服务的选择
在 GRAVATAR_STR 环境变量中,我使用 Cravatar 代替了 Waline 默认的 Libravatar。Libravatar 加载头像时会返回 302 重定向,这个 302 状态码会导致后退/前进缓存失效。Cravatar 是国内镜像服务,访问速度快且直接返回头像,没有重定向问题。
集成客户端
服务端配置完成后,接下来需要在博客中集成 Waline 的前端组件。
创建 layouts/partials/comments.html 文件:
点击展开完整代码
<noscript>
  <div style="text-align: center; padding: 20px; color: var(--secondary);">
    <p>💬 评论功能需要启用 JavaScript 才能使用</p>
  </div>
</noscript>

<div id="waline" style="margin-top: 30px;"></div>
<script>
  // 使用 IntersectionObserver 在评论区域接近可视区域时才加载
  (function() {
    const walineElement = document.getElementById('waline');
    let loaded = false;

    function loadWaline() {
      if (loaded) return;
      loaded = true;

      // 动态加载 CSS
      const link = document.createElement('link');
      link.rel = 'stylesheet';
      link.href = 'https://unpkg.com/@waline/client@v3/dist/waline.css';
      document.head.appendChild(link);

      // 动态加载 JS
      import('https://unpkg.com/@waline/client@v3/dist/waline.js').then(({ init }) => {
        init({
          el: '#waline',
          serverURL: 'https://你的 Waline 服务端地址',
          reaction: false,
          imageUploader: false,
          search: false,
          lang: 'zh-CN',
          dark: 'body[class="dark"]',
          emoji: [
            'https://unpkg.com/@waline/emojis@1.2.0/alus',
            '/images/waline/emoji/huaji',
          ]
        });
      });
    }

    // 如果支持 IntersectionObserver,在元素接近可视区域时加载
    if ('IntersectionObserver' in window) {
      const observer = new IntersectionObserver((entries) => {
        entries.forEach((entry) => {
          if (entry.isIntersecting) {
            loadWaline();
            observer.disconnect();
          }
        });
      }, {
        rootMargin: '200px' // 提前 200px 开始加载
      });

      observer.observe(walineElement);
    } else {
      // 降级方案:延迟加载
      setTimeout(loadWaline, 1000);
    }
  })();
</script>
在上面的代码中,针对 PageSpeed Insights 的性能检测做了优化,使用 IntersectionObserver 实现懒加载,只有当滚动到评论区附近时才动态加载 CSS 和 JS 资源,不影响首屏渲染。
更多配置项请参考 Waline 客户端配置文档。如果你也想使用滑稽表情包,可以参考 qwqcode/huaji 和我的 info.json。
添加图片画廊组件
PaperMod 主题对图片的支持比较基础,文章中的图片既不能点击放大查看,也不能排列布局。为了优化一下体验,我找到了 mfg92/hugo-shortcode-gallery 这个项目,它可以在文章中以画廊形式展示图片,支持响应式布局和点击预览。
具体效果可以看去长鹿旅游休博园这篇文章。
- 我使用 Git 子模块的方式安装(与主题的安装方式一致),在项目根目录中执行:
git submodule add https://github.com/mfg92/hugo-shortcode-gallery.git themes/hugo-shortcode-gallery
- 在
config.yaml中将该组件添加到theme字段:
theme: [PaperMod, hugo-shortcode-gallery]
- 在文章中使用
gallery加载图片:
{{< gallery match="images/*" sortOrder="asc" rowHeight="150" margins="5" thumbnailResizeOptions="600x600 q90 Lanczos" previewType="blur" embedPreview=true loadJQuery=true >}}
参数说明:
match: 图片路径匹配规则rowHeight: 缩略图行高margins: 图片间距thumbnailResizeOptions: 缩略图生成选项previewType: 预览效果(blur 为模糊过渡)
需要注意的是,这个组件支持展示图片的 Exif 信息(默认关闭)。如果启用该功能,构建时会扫描所有图片并提取元数据,构建时间会随图片数量和大小显著增加。如果你的图片比较多,建议关闭以提升构建速度。
更新日志
- 2026-01-11:优化文章列表布局,封面图片改为右侧展示
- 2025-10-20:添加图片画廊组件