上一篇文章介绍了 HTTP 服务启动时发生了什么,让我们对于 Hyperf 框架以及 HTTP 服务的启动过程有了更进一步的理解。今天我们继续来了解一下,当我们访问 HTTP 服务时,它是如何处理请求并返回响应内容的。
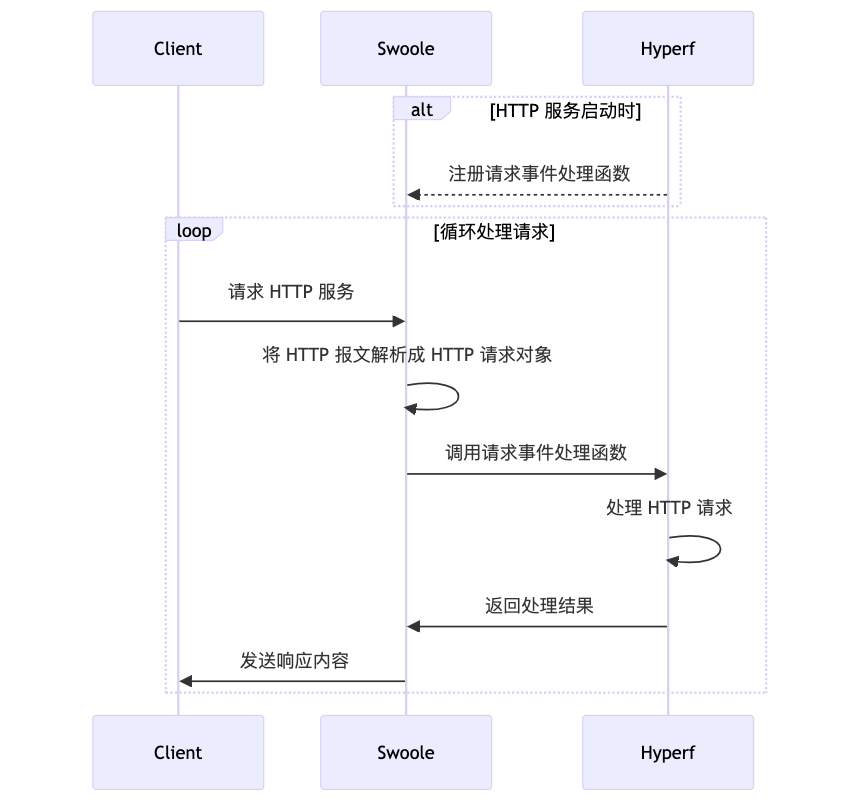
在 HTTP 服务启动时,Hyperf 会向 Swoole 注册请求事件处理函数。当收到 HTTP 请求时,Swoole 会调用该函数。
在 HTTP 服务启动后,当我们向 HTTP 服务发送请求时,HTTP 请求会被发送到 Swoole 中。Swoole 会将 HTTP 报文解析成 HTTP 请求对象,并构造出一个 HTTP 响应对象。
接着,Swoole 会调用请求事件处理函数,将请求和响应对象作为参数传递给该函数。在该函数中完成对请求的处理,并调用响应对象发送响应内容。
在这篇文章中,我们将分三个部分介绍 Hyperf 中 HTTP 服务处理请求的过程,在第一部分将会介绍如何注册 HTTP 服务的请求事件处理函数,第二部分会介绍如何处理 HTTP 请求并发送响应内容。
注册请求事件处理函数
在 HTTP 服务启动时,Hyperf 需要向 Swoole 注册请求事件处理函数,那么在 Hyperf 中这个处理函数是什么呢?
在 HTTP 服务「读取服务配置」阶段,会从 config/autoload/server.php 配置文件中获取配置信息,其中 Event::ON_REQUEST 是请求事件的枚举值,Hyperf\HttpServer\Server::onRequest() 就是请求事件的处理函数。
return [
    ...
    'servers' => [
        [
            ...
            'callbacks' => [
                Event::ON_REQUEST => [Hyperf\HttpServer\Server::class, 'onRequest'],
            ],
        ],
    ],
    ...
]
在「初始化 HTTP 服务」阶段,将请求事件处理函数注册到 Swoole 中,这部分工作的主要内容如下所示:
foreach ($events as $event => $callback) {
    ...
    [$className, $method] = $callback;
    $class = $this->container->get($className);
    if (method_exists($class, 'setServerName')) {
        // 设置服务名称
        $class->setServerName($serverName);
    }    // 初始化核心中间件
    if ($class instanceof MiddlewareInitializerInterface) {
        $class->initCoreMiddleware($serverName);
    }
    ...
    // 注册事件处理函数
    $server->on($event, $callback);
}
在 initCoreMiddleware() 方法中,初始化了 HTTP 服务的路由信息,并且通过服务名称获取该 HTTP 服务的中间件以及异常处理器。
public function initCoreMiddleware(string $serverName): void  {
    $this->serverName = $serverName;
    $this->coreMiddleware = $this->createCoreMiddleware();
    $config = $this->container->get(ConfigInterface::class);
    $this->middlewares = $config->get('middlewares.' . $serverName, []);
    $this->exceptionHandlers = $config->get('exceptions.handler.' . $serverName, $this->getDefaultExceptionHandler());
}
处理 HTTP 请求
通过上面的内容我们可以知道,处理 HTTP 请求的逻辑是在 Hyperf\HttpServer\Server::onRequest() 方法中完成的,该方法的原型如下:
public function onRequest($request, $response): void
对于 Hyperf\HttpServer\Server::onRequest() 方法来说,我把它执行的工作分成了以下几个阶段。
初始化请求和响应对象
在这一阶段中,需要初始化 PSR-7 请求和响应对象。这是因为,Hyperf 的标准组件都是基于 PSR 标准实现的,而底层框架可能并没有基于 PSR 标准实现,因此需要先进行兼容性适配。
[$psr7Request, $psr7Response] = $this->initRequestAndResponse($request, $response);
在 initRequestAndResponse() 方法中,先判断对象是否基于 PSR 标准,如果不是,则将其转换成 PSR-7 请求和响应对象。
匹配请求的路由信息
在这一阶段中,调用 Hyperf\HttpServer\CoreMiddleware::dispatch() 方法,使用上面初始化好的 PSR-7 请求对象匹配路由信息。
$psr7Request = $this->coreMiddleware->dispatch($psr7Request);
在 dispatch() 方法中,使用请求对象的请求方式、请求地址匹配 HTTP 服务中的路由信息,将匹配结果转换成 Hyperf\HttpServer\Router\Dispatched 对象,并保存到新的请求对象的属性中并返回。
public function dispatch(ServerRequestInterface $request): ServerRequestInterface
{
    $routes = $this->dispatcher->dispatch($request->getMethod(), $request->getUri()->getPath());

    $dispatched = new Dispatched($routes);
    return Context::set(ServerRequestInterface::class, $request->withAttribute(Dispatched::class, $dispatched));
}
看到这里,你可能会有疑问,为什么不将 Dispatched 直接保存到原来的请求对象的属性中?
因为这是 PSR-7 标准规定的。在 PSR-7 标准中,请求被认为是不可变的;必须实现所有可能更改状态的方法,以便它们保留当前请求的内部状态,并返回包含更改状态的实例。
也就是说,如果你想修改请求对象中的信息,那么你必须从当前对象中克隆一个新的对象,然后在新的对象中进行修改并返回新的对象。下面是 withAttribute 方法的实现:
public function withAttribute($name, $value)
{
    $clone = clone $this;
    $clone->attributes[$name] = $value;
    return $clone;
}
知道了这一点之后,相信你以后再也不会有「为什么我设置了属性但是却拿不到值」这种疑惑了。
准备全局和路由中间件
在 HTTP 服务中,中间件根据作用范围分为两种:全局中间件和路由中间件。
全局中间件会被应用到所有路由上,而路由中间件仅应用到部分路由上,是否应用需要根据路由匹配结果来决定。如果匹配到了路由,则从中间件管理器中获取该路由的中间件。否则,仅使用全局中间件。
$dispatched = $psr7Request->getAttribute(Dispatched::class);
// 获取全局中间件
$middlewares = $this->middlewares;
// 判断是否匹配到了路由
if ($dispatched->isFound()) {
    // 通过服务名称、请求地址、请求方式获取路由中间件
    $registeredMiddlewares = MiddlewareManager::get($this->serverName, $dispatched->handler->route, $psr7Request->getMethod());
    $middlewares = array_merge($middlewares, $registeredMiddlewares);
}
在一切准备就绪后,Hyperf 会调用 Hyperf\Dispatcher\HttpDispatcher::dispatch() 方法,将请求对象依次交给每个中间件进行处理,然后调用核心中间件的 Hyperf\HttpServer\CoreMiddleware::process() 方法进行最终处理。
$psr7Response = $this->dispatcher->dispatch($psr7Request, $middlewares, $this->coreMiddleware);
执行路由处理函数
在 Hyperf\HttpServer\CoreMiddleware::process() 方法中,主要逻辑是根据 Dispatcher 对象的状态执行相应的动作。
- 如果路由不存在,则抛出
NotFoundHttpException异常。 - 如果请求方式不正确,则抛出
MethodNotAllowedHttpException异常。 - 如果找到路由,则解析并执行绑定在该路由上的处理函数,然后返回响应对象。
以下代码展示了这部分的执行逻辑。
public function process(ServerRequestInterface $request, RequestHandlerInterface $handler): ResponseInterface
{
    ...
    /** @var Dispatched $dispatched */
    $dispatched = $request->getAttribute(Dispatched::class);
    // 根据 `Dispatcher` 对象的状态执行相应动作
    $response = match ($dispatched->status) {
        Dispatcher::NOT_FOUND => $this->handleNotFound($request),
        Dispatcher::METHOD_NOT_ALLOWED => $this->handleMethodNotAllowed($dispatched->params, $request),
        Dispatcher::FOUND => $this->handleFound($dispatched, $request),
        default => null,
    };
    ...
}
Hyperf 支持闭包和请求处理器两种方式设置路由的处理函数,以下是这两种方式的示例。
// 闭包
Router::get('/hello-hyperf', function () {
    return 'Hello Hyperf.';
});

// 请求处理器,下面三种方式的任意一种都可以达到同样的效果
Router::get('/hello-hyperf', 'App\Controller\IndexController::hello');
Router::get('/hello-hyperf', 'App\Controller\IndexController@hello');
Router::get('/hello-hyperf', [App\Controller\IndexController::class, 'hello']);
在 handleFound() 方法中,如果处理函数是闭包,则调用 parseClosureParameters() 方法解析闭包的参数,然后运行闭包。
if ($dispatched->handler->callback instanceof Closure) {
    $parameters = $this->parseClosureParameters($dispatched->handler->callback, $dispatched->params);
    $callback = $dispatched->handler->callback;
    $response = $callback(...$parameters);
}
如果处理函数是请求处理器,则调用 prepareHandler() 方法解析出请求处理器中的控制器(Controller)和操作(Action),通过容器实例化出控制器对象,然后调用 parseMethodParameters() 方法解析操作方法的参数,最后运行该方法。
[$controller, $action] = $this->prepareHandler($dispatched->handler->callback);
$controllerInstance = $this->container->get($controller);
...
$parameters = $this->parseMethodParameters($controller, $action, $dispatched->params);
$response = $controllerInstance->{$action}(...$parameters);
处理函数执行完成后,如果返回的结果没有实现 ResponseInterface 接口,则调用 transferToResponse() 方法对其进行转换,最后返回响应对象。
if (! $response instanceof ResponseInterface) {
    $response = $this->transferToResponse($response, $request);
}
return $response->withAddedHeader('Server', 'Hyperf');
发送响应内容
有了响应对象之后,就需要将响应内容发送给客户端,这部分工作通过调用 Hyperf\HttpServer\ResponseEmitter::emit() 方法完成。
// Send the Response to client.
if (! isset($psr7Response) || ! $psr7Response instanceof ResponseInterface) {
    return;
}
if (isset($psr7Request) && $psr7Request->getMethod() === 'HEAD') {
    $this->responseEmitter->emit($psr7Response, $response, false);
} else {
    $this->responseEmitter->emit($psr7Response, $response);
}
在 emit() 方法中,将 PSR-7 响应对象中的响应头、Cookies 以及状态码等信息写入到 Swoole 的响应对象中。然后判断响应体是否为文件对象,如果是则调用 Swoole\Http\Response::sendfile() 方法将文件发送到客户端;否则调用 Swoole\Http\Response::end() 方法发送响应内容。
public function emit(ResponseInterface $response, mixed $connection, bool $withContent = true): void
{
    try {
        if (strtolower($connection->header['Upgrade'] ?? '') === 'websocket') {
            return;
        }
        // 将 PSR-7 响应对象的信息写入到 Swoole 的响应对象中
        $this->buildSwooleResponse($connection, $response);
        // 判断响应内容是否为文件
        $content = $response->getBody();
        if ($content instanceof FileInterface) {
            // 发送文件到客户端
            $connection->sendfile($content->getFilename());
            return;
        }
        // 发送响应内容
        if ($withContent) {
            $connection->end((string) $content);
        } else {
            $connection->end();
        }
    } catch (Throwable $exception) {
        $this->logger?->critical((string) $exception);
    }
}
最后,我们就能够在浏览器中看到响应内容了。
总结
在这篇文章中,我们了解了 Hyperf 处理 HTTP 请求的完整流程。希望这些内容能帮你更好地理解 Hyperf 的工作原理。